Sign Up

Onboarding process

Initial system setup is crucial to efficiantly start using the app. This guide helps you to understand and go through each step.

User preferences

1. Language

Select your preferred Language

Onboarding.svg


2. Personal details

In this step please fill up your personal details and set the Avatar you'll use within the app. The Avatar is by default created your name initials however you are free to change this to any double letters.

Onboarding-1.svg


3. Appearance

Select your preferred theme

Onboarding-2.svg


System setup

4. User invitation

Invite you colleagues to join your new workspace. You will be able to set their roles later in the Onboarding process.

If you skip this step you will be unable to assign Roles to these users in the last step

Onboarding-3.svg


5. Creating Project

Creating a first project is required! Once you create your first project, juno.one will provide you with a default set of priorities and statuses to get you started. You can always edit these and/or create new ones in the Project Settings. That's also where you can create your labels, build workflows and set up integrations. If you skip this step juno.one will create one project automatically. Onboarding-4.svg


6. Timesheet activities

In order to record time in Timesheet module you must create activity types first.

Onboarding-5.svg

juno.one provides a set of basic activities to start with but you are free to add more or edit the default ones. To create activity type click the Add activity type button.

Screenshot 2024-05-14 120650.png 
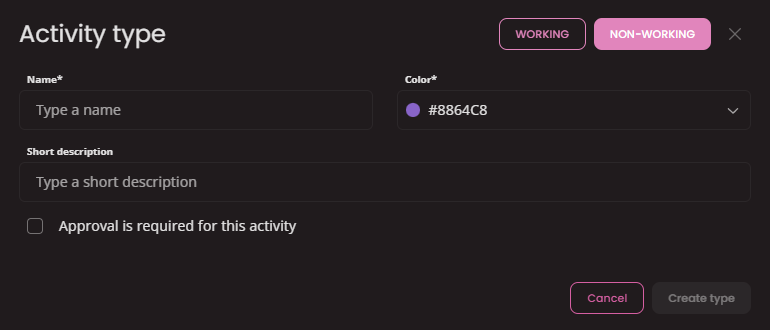
Each activity type has several options to set:

  • Name : Name your activity type.
  • Color : Choose color for better distinguishing Activities from each other.
  • Description : Description can help other users to understand how to use the Activity.
  • Type : Working / Non-workingtype helps to separate work related activities from Non-working ones).
  • Approval : Section where particular Approvers can be set.

Roles & Permissions

In this step you are able to create your own Roles with custom set of Permissions. This requires a certain level of understanding how the Permission service works. It's adviseable to read first dedicated page to Roles & Permissions first.

7. Setting up Roles

If you skip this step you will be unable to assign Roles to the invited users in the last step

Onboarding-6.svg

Creating Specific role

specific_role_step_1.svg

  • Role Name: Name of the role (used in text searches)
  • Role Description: Description for furthe understandin what the role can and cannot. Description is only visible in Role table.

specific_role_step_1.svg In this step you will select What modules will user see & access in side navigation menu.

Please be aware accessing modules in main navigation doesn't mean this role will allow to make further changes inside that module.

specific_role_step_1.svg

Project
  • View : Allows to see Projects in project table
  • Create : Allows to create a new Project
  • Archive : Allows to Archive any Project
  • Delete : Allows to Delete any Project

Docs Space
  • View : The description can be set as prop or in the default slot with full markdown support.
  • Create : The description can be set as prop or in the default slot with full markdown support.
  • Delete : The description can be set as prop or in the default slot with full markdown support.

Timesheet Activity
string
  • Approve all : Allows to Approve/Decline any activity for anyone

Settings - User
string
  • View : The description can be set as prop or in the default slot with full markdown support.
  • Create : The description can be set as prop or in the default slot with full markdown support.
  • Edit : The description can be set as prop or in the default slot with full markdown support.
  • Import : The description can be set as prop or in the default slot with full markdown support.
  • Delete : The description can be set as prop or in the default slot with full markdown support.
  • Undelete : The description can be set as prop or in the default slot with full markdown support.
  • Lock : The description can be set as prop or in the default slot with full markdown support.
  • Unlock : The description can be set as prop or in the default slot with full markdown support.

Settings - Team
string
  • View : The description can be set as prop or in the default slot with full markdown support.
  • Create : The description can be set as prop or in the default slot with full markdown support.
  • Edit : The description can be set as prop or in the default slot with full markdown support.
  • Delete : The description can be set as prop or in the default slot with full markdown support.
  • Undelete : The description can be set as prop or in the default slot with full markdown support.

Settings - Roles
string
  • View : The description can be set as prop or in the default slot with full markdown support.
  • Create : The description can be set as prop or in the default slot with full markdown support.
  • Edit : The description can be set as prop or in the default slot with full markdown support.
  • Delete : The description can be set as prop or in the default slot with full markdown support.
  • Undelete : The description can be set as prop or in the default slot with full markdown support.
  • Clone : The description can be set as prop or in the default slot with full markdown support.

Settings - Broadcast messages
string
  • View : The description can be set as prop or in the default slot with full markdown support.
  • Create : The description can be set as prop or in the default slot with full markdown support.
  • Edit : The description can be set as prop or in the default slot with full markdown support.
  • Delete : The description can be set as prop or in the default slot with full markdown support.

Settings - Billing
string
  • View : The description can be set as prop or in the default slot with full markdown support.
  • Create : The description can be set as prop or in the default slot with full markdown support.
  • Edit : The description can be set as prop or in the default slot with full markdown support.
  • Cancel : The description can be set as prop or in the default slot with full markdown support.

Settings - Integrations
string
  • View : The description can be set as prop or in the default slot with full markdown support.
  • Edit : The description can be set as prop or in the default slot with full markdown support.

Creating Team role

specific_role_step_1.svg

  • Role Name: Name of the role (used in text searches)
  • Role Description: Description for furthe understandin what the role can and cannot. Description is only visible in Role table.

specific_role_step_1.svg In this step you will select What modules will user see & access in side navigation menu.

Please be aware accessing modules in main navigation doesn't mean this role will allow to make further changes inside that module.

specific_role_step_1.svg


8. Creating Teams

Projects and Docs are modules based on team collaboration. Each team may have infinite number of users.

A single team has a unique name and Avatar. Avatar is set by two letters, background and text color. For each team is able to write a short description as well.

If you skip this step you will be unable to assign Team Roles in the last step

Onboarding-7.svg


9. Role to team assignment

For each invited user You are now able to assign previousy created Roles and Teams

Onboarding-8.svg

In order to successfully assign roles It's necessary to use the data created in previous steps.